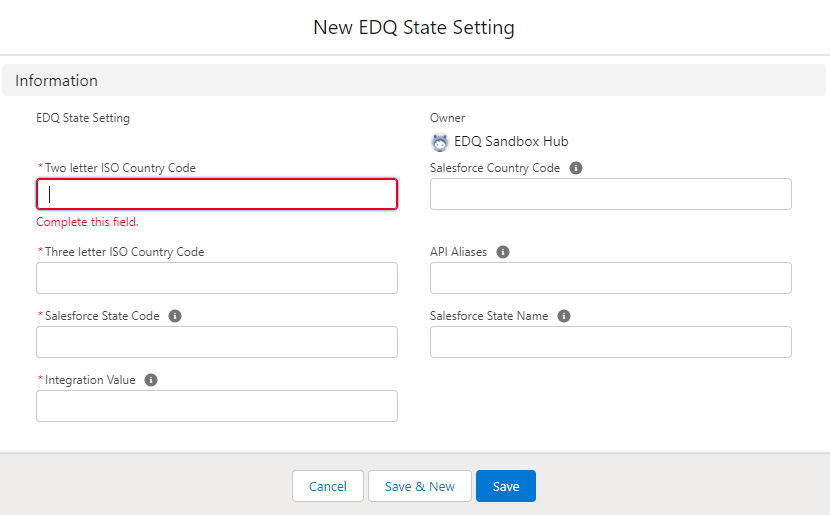
This is a new custom object (so you are able to add and remove these objects) that has been added to facilitate the integration with State and Country/Territory Picklists. The default list of EDQ State Settings, much like Salesforce State picklists, is not conclusive, and states that are returned by Experian address API but are not in either list by default, can be added to both. How the corresponding EDQ State Setting and Salesforce State Picklist state item relate are detailed in the "Northern Territory" renaming example here: State and Country/Territory Picklists configuration.
It has its own tab accessible via the App Launcher Icon. The tab shows all the State settings configured when viewed with the All list view.
The State Setting object consists of:
- 5 required fields:
- Two letter ISO Country Code field - Must be the 2 letter ISO code for the country.
- Three letter ISO Country Code field - Must be the 3 letter ISO code for the country.
- Salesforce State Code field - Must match the State Code of the state on the Salesforce State Details page
- Integration Value field - Must match the Integration Value of the state on the Salesforce State Details page for the associated country.
- Salesforce State Name field - The name you want to display for the state. You'll want to name this the same as the "State Name" in State and Country/ Territory Picklists" as detailed here: State and Country/Territory Picklists configuration
- 2 optional field:
- Salesforce Country Code field - This only needs to be filled if the country code in Salesforce State and Country/Territory Picklists has been modified to use the 3-letter ISO code. In this case enter the 3-letter ISO code here.
- API Aliases field - Used when there is a mismatch between the state value returned by the address API and the Integration Value held by the Salesforce State picklist.

If you are missing any of the fields above, see the steps detailed here: Troubleshoot > I'm missing fields from the EDQ State Setting Object
To create a new EDQ State Setting object:
- Go to the App Launcher.
- In the search box type EDQ State Settings and select it.
- click New in the top right.
- Enter the mandatory fields: Two letter ISO Country Code, Three letter ISO Country Code, Salesforce State Code, Integration Value, and Salesforce State Name.
- (Optional) Enter API Aliases.
- Click Save.
Validation
Although the Two and Three Letter ISO Country Codes can be validated on saving, unfortunately, the internal Salesforce API does not allow us to validate the Integration Value field against the Integration Value in the Salesforce State picklist before saving. This means that it is possible for the user to enter a value that is not present in the Salesforce State picklists.
If a State Setting entry is created where the Integration Value field does not correspond to an existing state entry in the Salesforce States picklist for the associated country, then when a user saves an address for that state the save operation fails. An error message will be displayed.
Renaming a State label
Are you using Translation Workbench?
If you have created custom state labels in the Translation Workbench, these are the ones that will appear in your forms. The database will still show the details from the EDQ State Setting Details page.
If you wish to change the label for the State in the picklist and for this to appear in the EDQ components, follow the steps detailed here: State and Country/Territory Picklists configuration.