Once you've established your duplicate store, you can search for records within it and maintain them over time.
When you search the duplicate store for a target record, clusters of similar records (based on your search criteria) may be returned. This will allow you to determine whether your target record is brand new and should be added to the store, or whether the source data needs to be further maintained. Check out search tutorials for more details.
Maintenance operations can then assist with keeping the duplicate store in line with any changes to your source data, as well as making any changes based on searches that were performed. Check out maintenance tutorials for more details.
Before performing any searching or maintenance operations, you have to first unlock your encrypted duplicate store (otherwise any operations to access data from the store will not be permitted).
Once you've completed your operations, we strongly recommend that you lock the store again to prevent any unauthorized modifications.
Unlock

To unlock your duplicate store, you have to specify the name of the store and the original encryption key used when running the Find duplicates step. Successfully entering these will then unlock the store for further use.
Lock

To lock your duplicate store again, you have to specify the name of the store. This will then remove the encryption key to lock the store back up again and prevent unauthorized access.
To go through these tutorials, you need:
Data Studio (v1.5 or above) installed, licensed and running.
Find duplicates step licensed, with default deployment settings.
An established duplicate store that has been created via the Find duplicates step, by using:
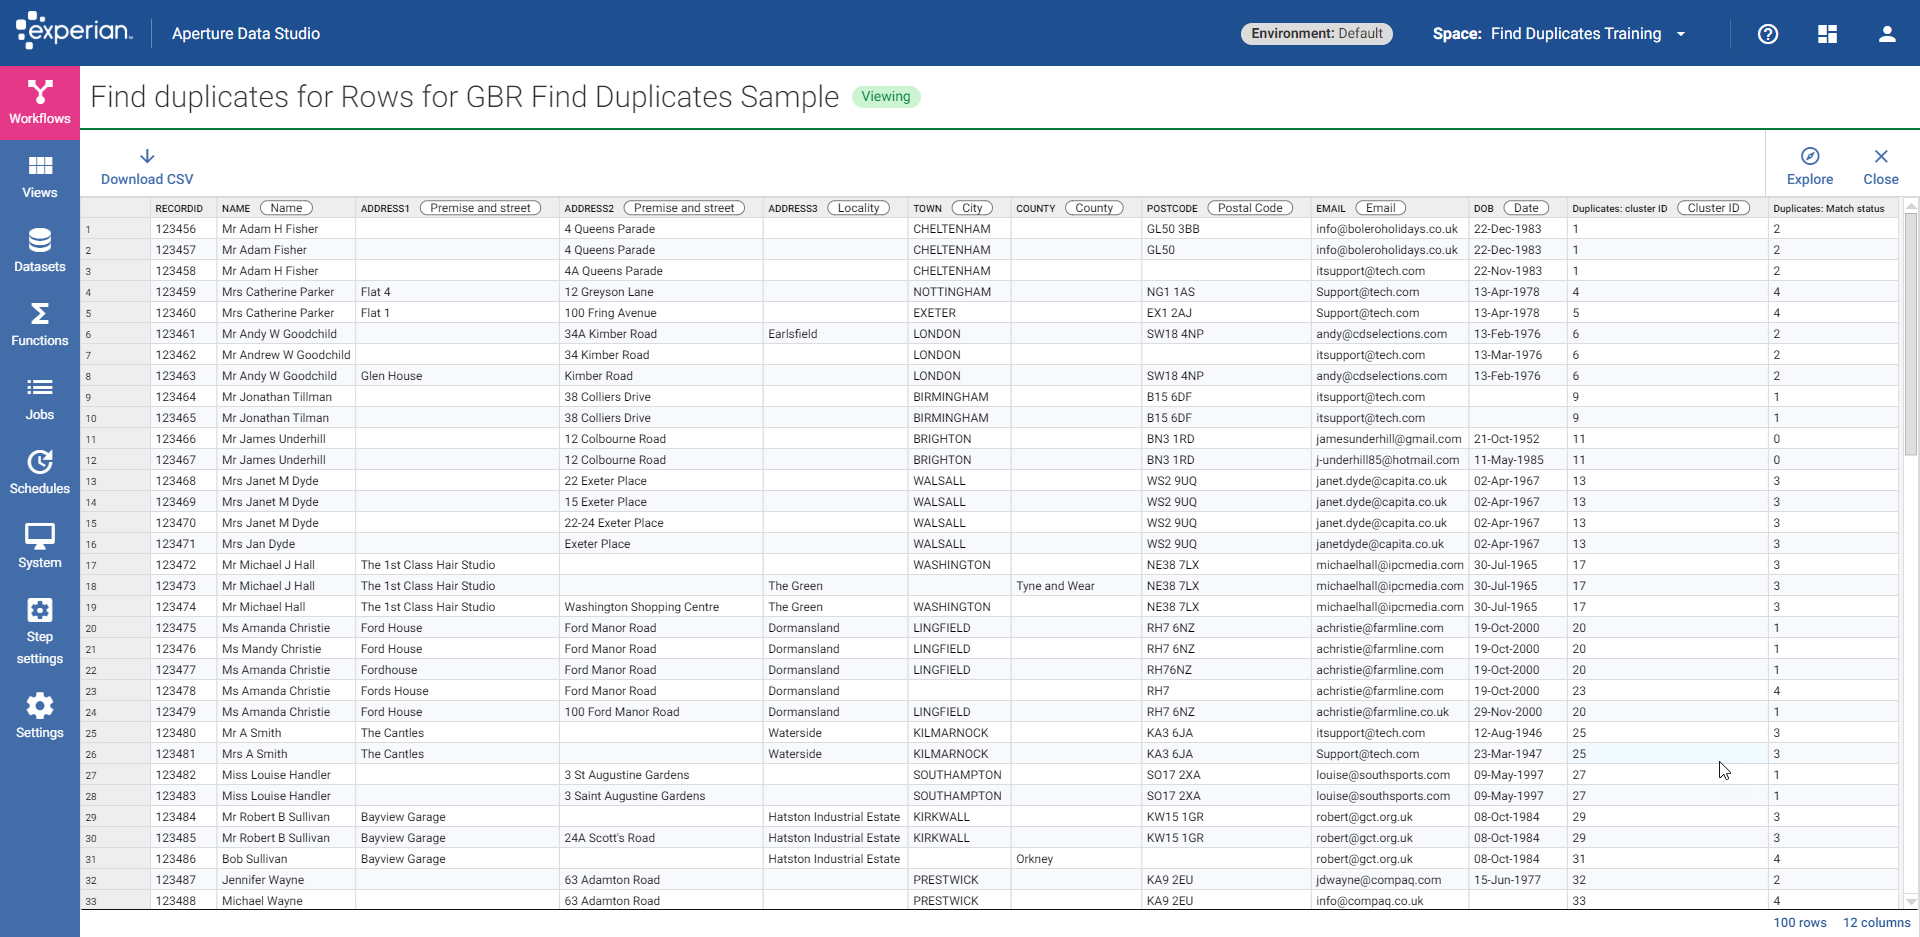
Once the prerequisites are met and you execute the Find duplicates step, you should have an output in Data Studio similar to this:
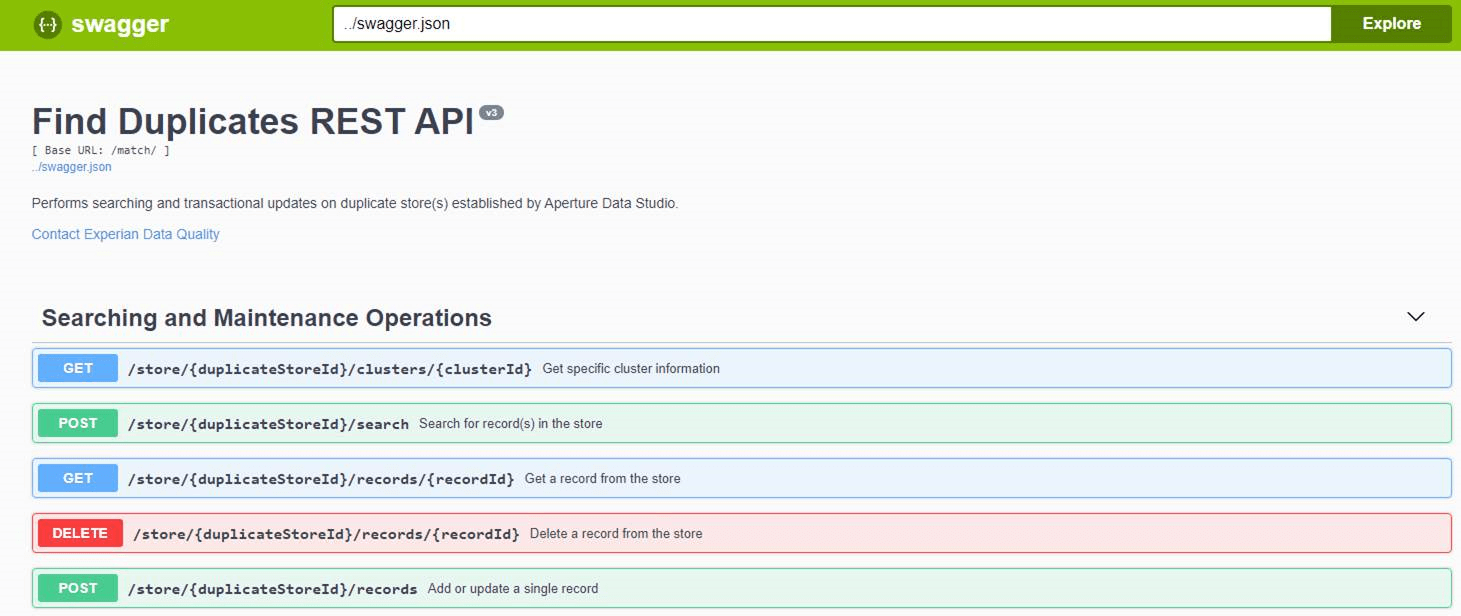
For this tutorial we will be using the Find duplicates REST API Swagger interactive documentation. With default deployment settings based on the prerequisites, this should be hosted at http://localhost:7701/experian-match-api/match/docs/index.html. You should be able to copy and paste the objects from the tutorial into the relevant requests, which will provide you with a better understanding of each request and the workflow.
Navigating to the Swagger link should bring up the main operations that can be performed for searching and transactional maintenance:
After a duplicate store has been established, you can search against it to find records which could potentially match against your target record. This is so that the store can be checked for existing matches to protect duplicates from being entered. Searching may also be a pre-condition for performing transactional maintenance.

This operation allows you to find cluster information for a single record.
Path parameters:
The result will be that single record (if it exists), including the cluster it belongs to, the match level of the cluster, and the record content.
For this tutorial, we want to search the duplicate store called DEMO for record 123456.
The request would look like this: GET /match/store/DEMO/records/123456
The following response should be returned:
{
 "matchInternalId": 1,
 "clusterId": 1,
 "matchStatus": 2,
 "data": [
   "123456",
   "Mr Adam H Fisher",
   "",
   "4 Queens Parade",
   "",
   "CHELTENHAM",
   "",
   "GL50 3BB"
   ]
}

This operation allows you to find all record information contained within a specific cluster.
Path parameters:
The result will be all records in the specified cluster, including their unique IDs.
For this tutorial, we want to search the duplicate store called DEMO for the cluster that the record 123456 belonged to in the previous example (i.e. 1).
The request would look like this: GET /match/store/DEMO/clusters/1
The following response should be returned:
[
 {
  "matchInternalId": 1,
  "clusterId": 1,
  "matchStatus": 2,
  "uniqueId": "123456"
 },
 {
  "matchInternalId": 2,
  "clusterId": 1,
  "matchStatus": 2,
  "uniqueId": "123457"
 },
 {
  "matchInternalId": 3,
  "clusterId": 1,
  "matchStatus": 2,
  "uniqueId": "123458"
 }
]
From this output, you should see that cluster ID 1 contains 2 additional records: 123457 and 123458. The content of these records can then be retrieved using the search by record ID endpoint from the previous tutorial. It can also be observed that the matchStatus of the cluster is the same for every record, and is the same as the matchStatus returned from the previous tutorial.

This operation allows you to find records based on specific search criteria, using the available data tags below (many of these will be used throughout the tutorials to show how to best utilize them).
The tags are the same as the data tags available in Data Studio but there are also a few more specific ones that can be used for searching:
The only path parameter is the duplicate store name. The request body contains the search itself.
The result will be all records that match to the search terms, potentially spanning multiple clusters. These results will be sorted by highest match level to the search, followed by ascending cluster ID, then ascending record ID.
There are a few things to keep in mind when searching by fields. The example tutorials below will help you to understand how searching by fields works.
The search doesn't have to use every field that the records in the duplicate store contain but it must contain enough information to satisfy the same blocking keys that were used to identify duplicate records during establishment in Data Studio.
If there isn't enough information to satisfy them, it's possible that the resulting search level will be lower than expected, or potentially no results will be returned at all:
{
   "fields": {
      "" : [
         { "NAME" : "Adam Fisher" }
      ]
   }
}
⇓
[]
In the example above, searching on NAME alone will not return any matches. This is because the duplicate store was created using the default GBR individual blocking keys, which do not consider name on its own.
If the search is instead changed to include a postcode as well, there is at least one blocking key that will block the search and compare it against other records in the duplicate store with the same name and postcode:
{
   "fields": {
      "" : [
         { "NAME" : "Adam Fisher" },
         { "POSTCODE" : "GL50 3BB" }
      ]
   }
}
⇓
[
  {
    "clusterId": 1,
    "matchStatus": 2,
    "clusterRecords": [
        {
           "data": [
              "123456",
              "Mr Adam H Fisher",
              "",
              "4 Queens Parade",
              "",
              "CHELTENHAM",
              "",
              "GL50 3BB"
           ],
           "matchInternalId": 1,
           "searchMatchLevel": 3
        }
    ]
  }
]
In this case, only a single result is returned, with a search confidence (searchMatchLevel) of 3. This is the lowest level defined in the ruleset (see GBR individual rulesets), and this is returned because the search has a lot of missing information such as locality, premises number and street.
If the search is changed to include more search terms, a more complete set of search results will be returned since a lot more information has been provided to cause more matches to occur:
{
  "fields": {
      "" : [
         { "NAME" : "A Fisher" },
         { "ADDRESS" : "Queens Parade" },
         { "LOCALITY" : "CHELTENHAM" },
         { "POSTCODE" : "GL50" }
      ]
  }
}
⇓
[
  {
    "clusterId": 1,
    "matchStatus": 2,
    "clusterRecords": [
      {
        "data": [
          "123456",
          "Mr Adam H Fisher",
          "",
          "4 Queens Parade",
          "",
          "CHELTENHAM",
          "",
          "GL50 3BB"
        ],
        "matchInternalId": 1,
        "searchMatchLevel": 2
      },
      {
        "data": [
          "123457",
          "Mr Adam Fisher",
          "",
          "4 Queens Parade",
          "",
          "CHELTENHAM",
          "",
          "GL50"
        ],
        "matchInternalId": 2,
        "searchMatchLevel": 2
      },
      {
        "data": [
          "123458",
          "Mr Adam H Fisher",
          "",
          "4A Queens Parade",
          "",
          "CHELTENHAM",
          "",
          ""
        ],
        "matchInternalId": 3,
        "searchMatchLevel": 3
      }
    ]
  }
]
In this case, the results returned all belong to the same cluster; this is usually what will be expected since similar records should already have been identified and grouped together as potential duplicates as part of establishment.
The first and second record returned both return a searchMatchLevel of 2, whereas the third record returned has a searchMatchLevel of 3, indicating that the last record is not as strong of a match than the first two. This is because of the missing postcode in that third record.
The results indicate that the search record already exists within the duplicate store and so a further duplicate should not be introduced. It also has identified two potential records that should be removed from the data altogether.
The search schema can be different to the duplicate store schema. For this tutorial, the established duplicate store uses a schema of UNIQUE_ID | NAME | ADDRESS | ADDRESS | ADDRESS | LOCALITY | PROVINCE | POSTCODE (see the prerequisites). The search can use the same schema (shown in the previous tutorial), but it can also use a different schema providing correct standardization can still be performed and the establishment blocking keys and rules are still created/evaluated as before.
The example below uses a search schema of TITLE | FORENAMES | SURNAME | ADDRESS and specifies a full address in a single line rather than separate fields, and the response is a perfect match (searchMatchLevel of 0) to a record in the duplicate store. In this case, the search should not be added to the data since it would become a duplicate entry.
{
  "fields": {
      "" : [
         { "TITLE" : "Mrs" },
         { "FORENAMES" : "Catherine" },
         { "SURNAME" : "Parker" },
         { "ADDRESS" : "Flat 4, 12 Greyson Lane, Nottingham, NG1 1AS" }
      ]
  }
}
⇓
[
  {
    "clusterId": 4,
    "matchStatus": 4,
    "clusterRecords": [
     {
       "data": [
        "123459",
        "Mrs Catherine Parker",
        "Flat 4",
        "12 Greyson Lane",
        "",
        "NOTTINGHAM",
        "",
        "NG1 1AS"
      ],
      "matchInternalId": 4,
      "searchMatchLevel": 0
    }
   ]
  }
]
The search schema must also use the same groups as the duplicate store. These would have been defined during the establishment phase when mapping/tagging input fields in the Find duplicates step. If the search does not use those groups correctly, you may not get any results, or an error will be returned.
Using the same example as above, the group specified is " " (i.e. the default group). This will return results since all the elements in the duplicate store were also defined in the default group during establishment. However, if the search was modified to the example below, which separates the name and address into separately defined groups, an error will be returned because these groups were not used in establishment:
{
   "fields": {
      "NAMEGROUP" : [
         { "TITLE" : "Mrs" },
         { "FORENAMES" : "Catherine" },
         { "SURNAME" : "Parker" }
      ],
      "ADDRESSGROUP" : [
          { "ADDRESS" : "Flat 4, 12 Greyson Lane, Nottingham, NG1 1AS" }
      ]
   }
}
⇓
[
  Invalid field groups: [ADDRESSGROUP, NAMEGROUP] in the search fields not found in duplicate store schema
]
This is particularly important with data containing several examples of the same type (e.g. multiple emails or phone numbers) since they will need to be separated into their own groups during establishment, and searched in the same way via the search schema.
By default, searching by fields will use the same ruleset that was utilized during establishment. However, it's also possible to override these in the search with a new search-specific ruleset. This is especially useful if you only want to search on a reduced number of elements (providing there's still enough information for the blocking keys used in establishment to work) to return a broader set of results, or if you want to return higher confidence results despite missing information.
For example, if the search is only based on FORENAMES, SURNAME and POSTCODE, the establishment rules will be too strict to return any high confidence matches since there are too many elements missing in the search to satisfy them, but a new search-specific ruleset that only considers only FORENAMES, SURNAME and POSTCODE would return more results at greater confidence.
The example below includes a search-specific ruleset in the search request, which only considers the search to be an exact/close match if the postcode and surname are exact/close.
/*
* ALIASES
*/
define Exact as L0
define Close as L1

/*
* MATCH LEVELS
*/
Match.Exact={Surname.Exact & Postcode.Exact}
Match.Close={Surname.Close & Postcode.Close}

/*
* Surname rules
*/
Surname.Exact={[ExactMatch]}
Surname.Close={Levenshtein[77%]}

/*
* Postcode rules
*/
Postcode.Exact={StandardSpelling.[ExactMatch]}
Postcode.Close={StandardSpelling.Levenshtein[1] | StandardSpelling.PostcodeCompare[Part1Match]}
The response returns two high confidence matches at two different addresses, with one being an exact match to the search surname and postcode, and one being a close match due to the slightly different spelling of the surname. Depending on the use case, this could either be considered as the same person based on the search criteria (in which case one could be removed from the duplicate store) or considered two different people in the data:
{
   "fields": {
      "" : [
         { "SURNAME" : "Brian" },
         { "POSTCODE" : "HP2 1SW" }
      ]
   },
   "rules": "\/*\r\n* ALIASES\r\n*\/\r\ndefine Exact as L0\r\ndefine Close as L1\r\n\r\n\/*\r\n* MATCH LEVELS\r\n*\/\r\nMatch.Exact={Surname.Exact & Postcode.Exact}\r\nMatch.Close={Surname.Close & Postcode.Close}\r\n\r\n\/*\r\n* Surname rules\r\n*\/\r\nSurname.Exact={[ExactMatch]}\r\nSurname.Close={Levenshtein[77%]}\r\n\r\n\/*\r\n* Postcode rules\r\n*\/\r\nPostcode.Exact={StandardSpelling.[ExactMatch]}\r\nPostcode.Close={StandardSpelling.Levenshtein[1] | StandardSpelling.PostcodeCompare[Part1Match]}"
}
⇓
[
  {
    "clusterId": 99,
    "matchStatus": 4,
    "clusterRecords": [
      {
        "data": [
          "123554",
          "Mrs Susan Brian",
          "",
          "12 Arckley Crescent",
          "",
          "HEMEL HEMPSTED",
          "",
          "HP2 1SW"
        ] ,
        "matchInternalId": 99,
        "searchMatchLevel": 0
      }
    ]
  },
  {
    "clusterId": 100,
    "matchStatus": 4,
    "clusterRecords": [
     {
        "data": [
          "123555",
          "Mrs Susan Bryan",
          "",
          "28 Datchet Close",
          "",
          "HEMEL HEMPSTED",
          "",
          "HP2 1SW"
      ],
      "matchInternalId": 100,
      "searchMatchLevel": 1
     }
    ]
  }
]
If no country is specified as part of the search fields, you can set the default country for searching within the search rules themselves.
This can be done in the same way as when defining the default country in the establishment rules. If no country is specified in the search rules or search fields, the default country will be taken from the establishment rules instead (by default, GBR if not specified in the establishment rules either).
It's also possible to search by string array rather than by specific fields. This can be useful if you want to use the same schema as the duplicate store and you already know what element in the store each part of the array corresponds to.
The example below converts a search by fields into a search by array. Since the duplicate store schema is UNIQUE_ID | NAME | ADDRESS | ADDRESS | ADDRESS | LOCALITY | PROVINCE | POSTCODE (see the prerequisites), the fields below can be converted into their corresponding string array, including empty strings for undefined fields.
{
   "fields": {
      "" : [
         { "NAME" : "A Fisher" },
         { "ADDRESS" : "Queens Parade" },
         { "LOCALITY" : "CHELTENHAM" },
         { "POSTCODE" : "GL50" }
      ]
   }
}
⇓
{
   "data": [
      "",
      "A Fisher",
      "",
      "Queens Parade",
      "",
      "CHELTENHAM",
      "",
      "GL50"
   ]
}
This type of search also supports search-specific rulesets, as shown below.
{
  "data": [
      "",
      "A Fisher",
      "",
      "Queens Parade",
      "",
      "CHELTENHAM",
      "",
      "GL50"
   ],
   "rules": "<rule string>"
}
After a duplicate store has been established, you can maintain its data to bring it into line with any changes to the source data it was created from.
Records within the store can be deleted or updated, and new individual records can also be added to the store without the need for re-establishment.
In performing a maintenance operation, the request will apply all relevant operations to the record, including standardization, keying, blocking, scoring and clustering, potentially leading to changes to any other records that have been clustered with that record either previously or as part of the operation.
The response will then return information about the maintenance operation, including other records that may have been affected and any changes to their status or values in the duplicate store.

This operation allows you to add a new record within the duplicate store.
The only path parameter is the duplicate store name. The request body contains the record to be added.
The result will be the newly added record, including the cluster it belongs to and the match level of the cluster.
In the example request below, record ID 123556 is a new ID that does not already exist within the duplicate store, and therefore it will be known that the request is an add. Had the ID been 123555, which already exists in the store, the request would be treated as an update instead:
{
 "data": [
   "123556",
   "Mr John Smith",
   "Flat 14",
   "Pembroke House",
   "1 High Street",
   "BRIGHTON",
   "",
   "BN3 1EJ"
 ]
}
The following response should be returned:
{
 "beforeState": {
   "record": null,
   "clusters": []
  },
  "afterState": {
    "record": {
      "data": [
        "123556",
        "Mr John Smith",
        "Flat 14",
        "Pembroke House",
        "1 High Street",
        "BRIGHTON",
        "",
        "BN3 1EJ"
     ],
     "matchInternalId": 101
   },
   "clusters": [
    {
     "clusterId": 101,
     "matchStatus": 4,
     "clusterRecords": [
      {
       "matchInternalId": 101,
       "uniqueId": "123556"
     }
    ]
   }
  ]
 }
}
Firstly, the state of the duplicate store before the new record was added is shown. The record content is null since it previously did not exist, and the value of clusters is empty, meaning no previously existing clusters were affected by the operation.
Secondly, the state of the duplicate store*after * the new record was added is shown. The record content is populated since this is the new record that was added to the duplicate store as part of the operation. More importantly, you can see that it has been added to the duplicate store as a unique record, due to the matchStatus value of 4 and the clusterId value being a new number, 101, which previously would not have existed in the store (since there were only 100 records in the sample file within Data Studio).
If the search by record ID endpoint is now used for record 123556, it should return the new record. Similarly, if the search by cluster ID endpoint is now used for cluster 101, it should return the new cluster with this unique record in.
In the next example, adding record 123557 will cause it to be added to an existing cluster because there is already a similar record in the duplicate store that it will be matched to:
{
 "data": [
   "123557",
   "Mr Michael N Wayne",
   "",
   "",
   "63 Adamson Road",
   "PRESTWICK",
   "",
   "KA9 2EU"
 ]
}
The following response should be returned:
{
  "beforeState": {
    "record": null,
    "clusters": [
      {
        "clusterId": 33,
        "matchStatus": 4,
        "clusterRecords": [
          {
            "matchInternalId": 33,
            "uniqueId": "123488"
          }
        ]
      }
    ]
  },
  "afterState": {
     "record": {
       "data": [
         "123557",
         "Mr Michael N Wayne",
         "",
         "",
         "63 Adamson Road",
         "PRESTWICK",
         "",
         "KA9 2EU"
       ],
       "matchInternalId": 102
    },
    "clusters": [
     {
      "clusterId": 33,
      "matchStatus": 1,
      "clusterRecords": [
      {
       "matchInternalId": 33,
       "uniqueId": "123488"
      },
      {
       "matchInternalId": 102,
       "uniqueId": "123557"
      }
     ]
    }
  ]
 }
}
Firstly, the state of the duplicate store before the new record was added is shown. The record content is null since it previously did not exist, but clusters contains a single cluster with an ID of 33, matchStatus of 4 and a record with an ID of 123488. This indicates that this cluster (and the single record within it) was affected by the new record being added to the duplicate store.
The state of the duplicate store after the new record was added is then shown. The record content is populated since this is the new record that was added to the duplicate store as part of the operation. But it can also be seen that the new record, 123577, has been added to cluster 33 (the same cluster shown in the before state) and the cluster has had its matchStatus value changed to 1 i.e. it has been added to an already existing cluster and matched to another record within the duplicate store at the second highest level of confidence.
This other record has a very similar street name, and no middle name initial or title, but is close enough to the newly added record for them to be considered duplicates and therefore clustered together.
The newly added record may have been an incorrect addition to the store (which is why using the searching operations first is recommended). Further maintenance operations can be performed to remove one of these records from the store, or update one if they should not be considered duplicates of one another.

This operation allows you to update a record within the duplicate store with newer information, such as a change of address or name.
The only path parameter is the duplicate store name. The request body contains the record to be updated.
The result will be the updated record, including the cluster it belongs to and the match level of the cluster.

In the example above, there are two Mr Ian Walters and one Mrs Jan Walters. All of them are registered to the same company address. Let's assume that the first Ian Walters record is a mistake, and instead of it there should be a third family member, Miss Jenny Walters, registered at that same address. Additionally, the address should also be updated to include the premises and street information that is in the third record.
The request body to update record 123540 within the duplicate store called DEMO will look like the following:
{
 "data": [
   "123540",
   "Miss Jenny Walters",
   "Sweet N Sour Chinese Takeaway",
   "Unit 1",
   "1127 Bolton Road",
   "BRADFORD",
   "",
   "BD2 4SP"
 ]
}
The following response should be returned:
{
 "beforeState": {
   "record": {
     "data": [
       "123540",
       "Mr Ian Walters",
       "Sweet N Sour Chinese Takeaway",
       "",
       "",
       "BRADFORD",
       "",
       "BD2 4SP"
     ],
     "matchInternalId": 85
   },
   "clusters": [
     {
       "clusterId": 85,
       "matchStatus": 0,
       "clusterRecords": [
         {
           "matchInternalId": 85,
           "uniqueId": "123540"
         },
         {
           "matchInternalId": 86,
           "uniqueId": "123541"
         }
       ]
     }
   ]
 },
 "afterState": {
   "record": {
     "data": [
       "123540",
       "Miss Jenny Walters",
       "Sweet N Sour Chinese Takeaway",
       "Unit 1",
       "1127 Bolton Road",
       "BRADFORD",
       "",
       "BD2 4SP"
     ],
     "matchInternalId": 85
   },
   "clusters": [
     {
       "clusterId": 85,
       "matchStatus": 4,
       "clusterRecords": [
         {
           "matchInternalId": 85,
           "uniqueId": "123540"
         }
       ]
     },
     {
       "clusterId": 86,
       "matchStatus": 4,
       "clusterRecords": [
         {
           "matchInternalId": 86,
           "uniqueId": "123541"
         }
       ]
     }
   ]
 }
}
Firstly, the state of the duplicate store before the record was updated is shown. The original version of the record is displayed, along with a cluster containing two records in with a matchStatus of 0 i.e. an exact match between the two records. This is in line with what Data Studio showed previously i.e. the two Ian Walters records are clustered together. it does not show the Jan Walters record, indicating that her information has not been affected by the maintenance operation.
The state of the duplicate store after the record was updated is then shown. The record has been changed to contain the content specified in the update request, and it can also be seen that the operation has caused the cluster of two records to split into two separate clusters with each containing a unique record. This makes sense since the operation updated one of the records to create two separate individuals instead of one: Mr Ian Walters and Miss Jenny Walters.
Using the search by record ID endpoint on any of these records (123540, 123541, 123542) will then show them belonging to their own unique clusters, and also illustrate that the duplicate store now contains three unique records for the three different individuals registered to that same address: Mr Ian Walters, Mrs Jan Walters and Miss Jenny Walters.

This operation allows you to delete a record from the duplicate store. You may wish to do this, for example, if the person in the record is no longer a client, and should therefore be removed from your data.
Path parameters:
The result will be any clusters that have been impacted by the delete operation, and the state of those clusters afterward.
For this tutorial, if we look at records 123466 and 123467 within Data Studio, we can see that they have been clustered together with a level 0 match i.e. they are identical (excluding email and date of birth, which were omitted from establishment to begin with).

Let's assume that the first record has the most up to date email address and date of birth; therefore, the second record is no longer required and can be removed from the duplicate store.
To do so, the request would look like this:
DELETE /match/store/DEMO/records/123467
If we delete record 123467 from the duplicate store called DEMO, the response object should look like this:
{
 "beforeState": {
   "record": {
     "data": [
       "123467",
       "Mr James Underhill",
       "",
       "12 Colbourne Road",
       "",
       "BRIGHTON",
       "",
       "BN3 1RD"
     ],
     "matchInternalId": 12
   },
   "clusters": [
     {
       "clusterId": 11,
       "matchStatus": 0,
       "clusterRecords": [
         {
           "matchInternalId": 11,
           "uniqueId": "123466"
         },
         {
           "matchInternalId": 12,
           "uniqueId": "123467"
         }
       ]
      }
    ]
  },
  "afterState": {
    "record": null,
    "clusters": [
      {
        "clusterId": 11,
        "matchStatus": 4,
        "clusterRecords": [
         {
           "matchInternalId": 11,
           "uniqueId": "123466"
         }
       ]
     }
   ]
 }
}
Firstly, the state of the duplicate store before the record was deleted is shown. The record content is shown with the same content seen in Data Studio, and it belonged to a cluster with an ID of 11, which contained two identical records (since the matchStatus value is 0). Again, this is consistent with what Data Studio was displaying.
The state of the duplicate store after the record was deleted is then shown. The record is now null since it no longer exists in the store. More importantly, you can see that the cluster it belonged to has now changed to a unique cluster (since the matchStatus value is 4) and contains only a single record. Essentially, the operation has successfully removed the duplicate record from the store and caused a single unique record to remain.
Record 123467 has been removed from the duplicate store; if you wish, you can double check this by using the search by record ID endpoint.
In the next example, if we look at records 123459 and 123460 within Data Studio, we can see that they have been identified as two unique records because of the difference in address information.

Let's assume that they have been identified to be the same person (due to sharing the same name and date of birth), where one of the records contains an out-of-date address and should therefore be removed from the duplicate store.
To do so, the request would look like this:
DELETE /match/store/DEMO/records/123460
If we delete record 123460 from the duplicate store called DEMO, the response object should look like this:
{
  "beforeState": {
   "record": {
     "data": [
     "123460",
     "Mrs Catherine Parker",
     "Flat 1",
     "100 Fring Avenue",
     "",
     "EXETER",
     "",
     "EX1 2AJ"
    ],
    "matchInternalId": 5
  },
  "clusters": [
   {
    "clusterId": 5,
    "matchStatus": 4,
    "clusterRecords": [
     {
       "matchInternalId": 5,
       "uniqueId": "123460"
     }
    ]
   }
  ]
 },
  "afterState": {
    "record": null,
    "clusters": []
 }
}
The before state shows the record in the duplicate store before being deleted, along with the fact that it belonged to a cluster with ID 5 and matchStatus of 4 i.e. it was a unique record within its own cluster.
More importantly, the after state shows that the record content is now null and the cluster it belonged to is empty. This makes sense since the record was removed from the duplicate store and no other records were in the cluster it belonged to, meaning that the cluster no longer exists either.
There's an additional operation that allows you to return information about all duplicate stores that have been successfully established and persisted to disk.

The information returned for each store includes:
Without specifying any filters, configuration information for all established duplicate stores will be returned. However, it is also possible to filter on specific duplicate store names by adding a name filter. Applying this filter using the DEMO duplicate store that you just created will create a request that looks like this:
GET /match/store?name=DEMO
If you have followed the prerequisites correctly, the following response should be returned:
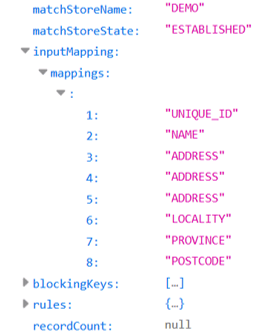
For the purposes of this example, the blockingKeys and rules values have been collapsed due to their size. However, it can be seen when expanding them that they are the same blocking keys and rules defined in Data Studio, and the input mappings are also the same values specified in the Find duplicates step (note that unmapped fields in the step are not shown since they are not processed). The store also has the correct name and state since it was successfully established via the step.
You may notice that the value of recordCount is null; this is because by default the count is not returned. To return the number of records in the duplicate store, you can add an additional filter to the request to return the count. Applying this filter on the DEMO duplicate store above will then create a request that looks like this:
GET /match/store?name=DEMO&returnCount=true
If you have followed the prerequisites correctly, the following response should be returned:
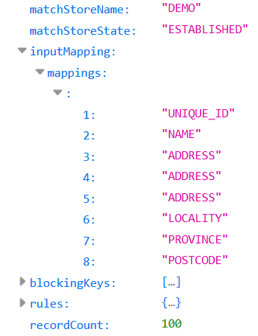
The response is identical to the previous, except this time the record count of 100 is present and correct, since it is the number of records in the sample file that was used in the Find duplicates step. Note that the count is also updated every time a maintenance operation is performed.
The count filter can also be used independently of the name filter. The request below will return the record count within the duplicate store information for all duplicate stores, not just one:
GET /match/store?returnCount=true
In order to support an integration of the search and maintain operations, you can refer to the Swagger interactive documentation which includes request and response examples, as well as the models that are used.
With default deployment settings and Data Studio running, this should be hosted at http://localhost:7701/experian-match-api/match/docs/index.html.
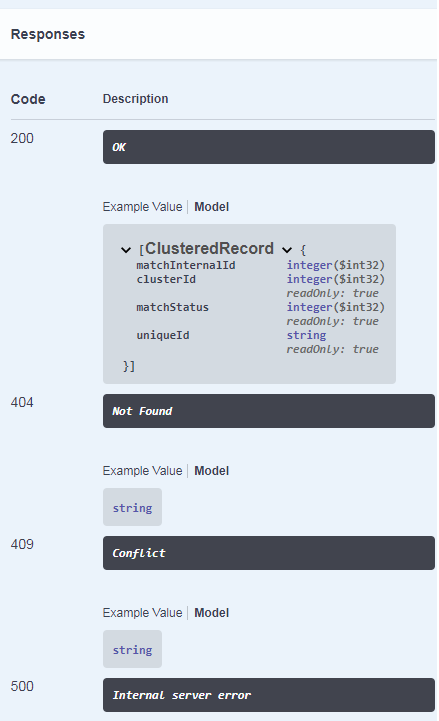
For example, the search by cluster ID endpoint includes the following expected responses:
